How to add a photo or image
How to add a photo or image
| Website Documentation / How ToPlease note: some components that include images (such as cards) will allow you to upload the image directly into that component. The following instructions are for images being uploaded into the general text (WYSIWYG) editor only.
Step 1: Create and resize your image
If the image you’re using is larger than the size you need for your content, please crop or resize it before uploading it. It can be resized after uploading it, but the file size will remain larger than needed and will slow down your page.
For instructions on how to do this, please contact the Webteam for help.
Step 2: Upload image
 Place your cursor where you would like the image to appear. Locate the "Upload image from computer" icon in the editor toolbar and click on it.
- A dialogue box will pop up on your screen allowing you to locate the file you want to upload. Find the file and double click on it -or- select it and click on the button it the dialogue box — this may say "Save" or "Open" or "Select" depending on your computer.
- Your image will be uploaded and placed on your page where you had the cursor located.
Step 3: Adding alternative text/description
- Once your image is uploaded you will see a dialogue box [fig. 1] asking you to add alternative text. Please add text describing the contents of the image and click on the check mark to save.

Note: if your photo or image is for decorative purposes only, you can toggle the "Decorative Image" switch instead and this image will be ignored by screen readers and will not be indexed in search engines.
Step 4: Aligning your image
After you save your Alternative text you will be given another dialogue box with additional options. The first set of options includes aligning your image with the content. By default, your image will be aligned to the left and will be on it's own line. Options include: [fig. 2]
- Align left - break text
- Align left — float text
- Align centre - break text
- Align right — float text
- Inline

Tip: hover over the icons to get a description of what they are.
Additional Options
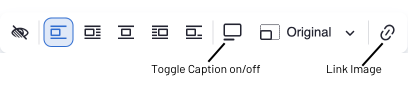
- You may add a caption to your image using the "Toggle Caption on/off" icon [fig. 3]. To add a caption toggle this to on and then add your caption text. If a caption is going to be used, it is typically best to use the "Align center — break text" alignment option.
- You can link your image to another page using the "Link Image" icon [fig. 3] on the far right and add the link in the dialogue box that pops up.